


How to Set Up a Chafing Dish: 7 Steps in 25 Minutes
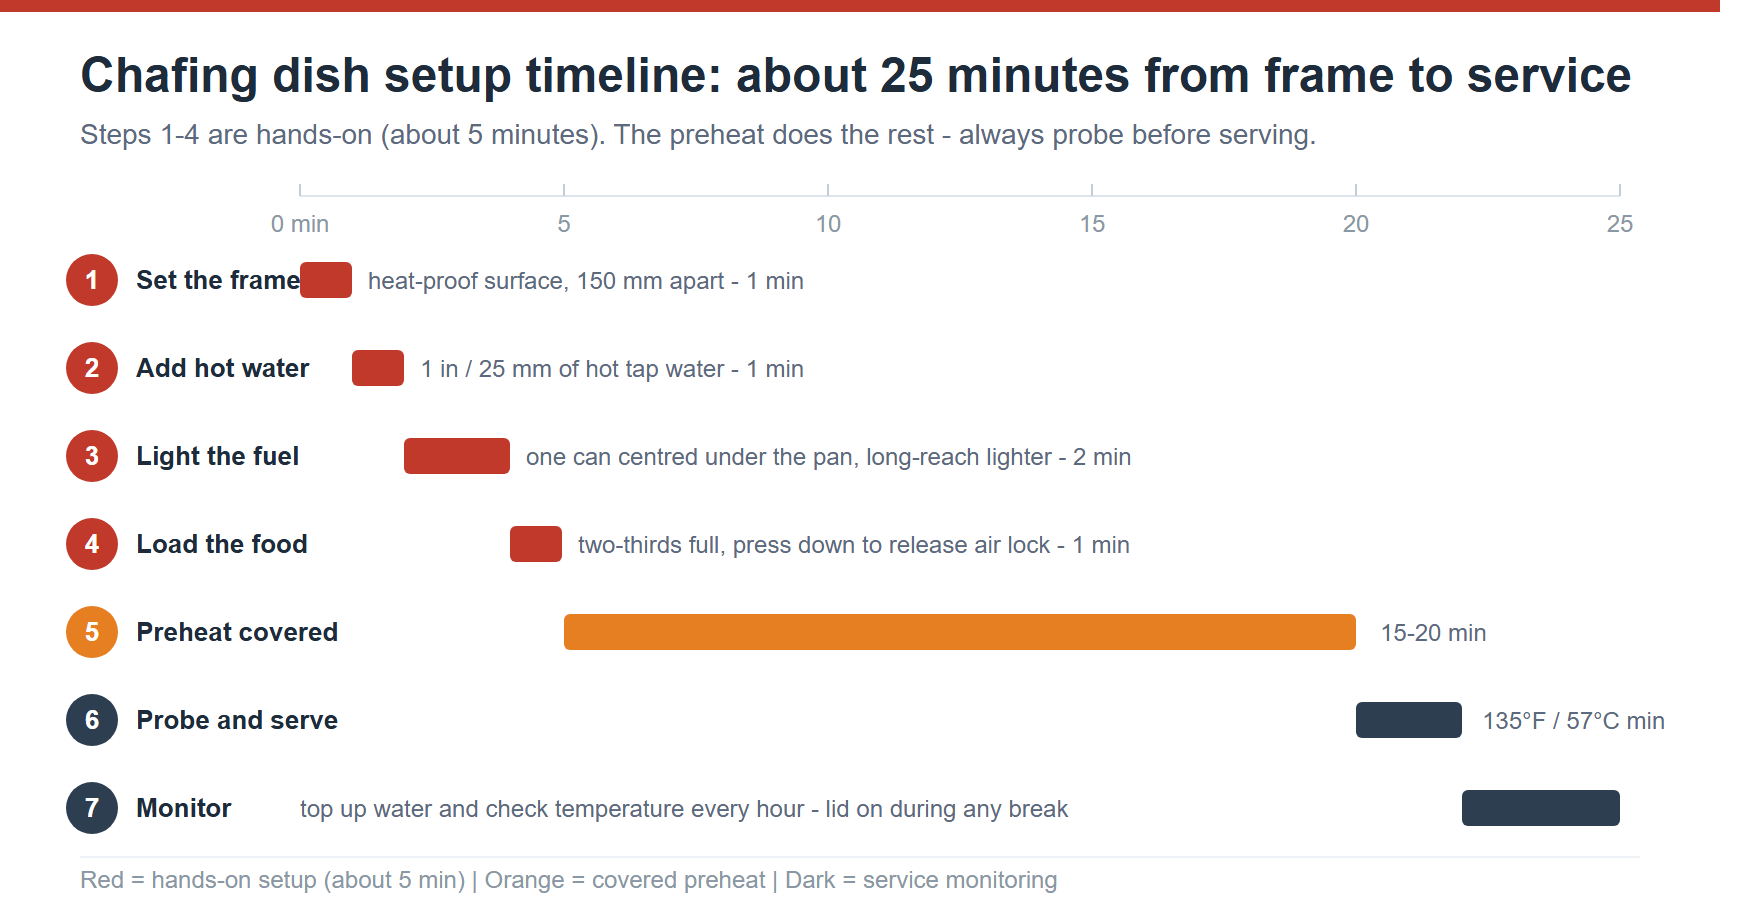
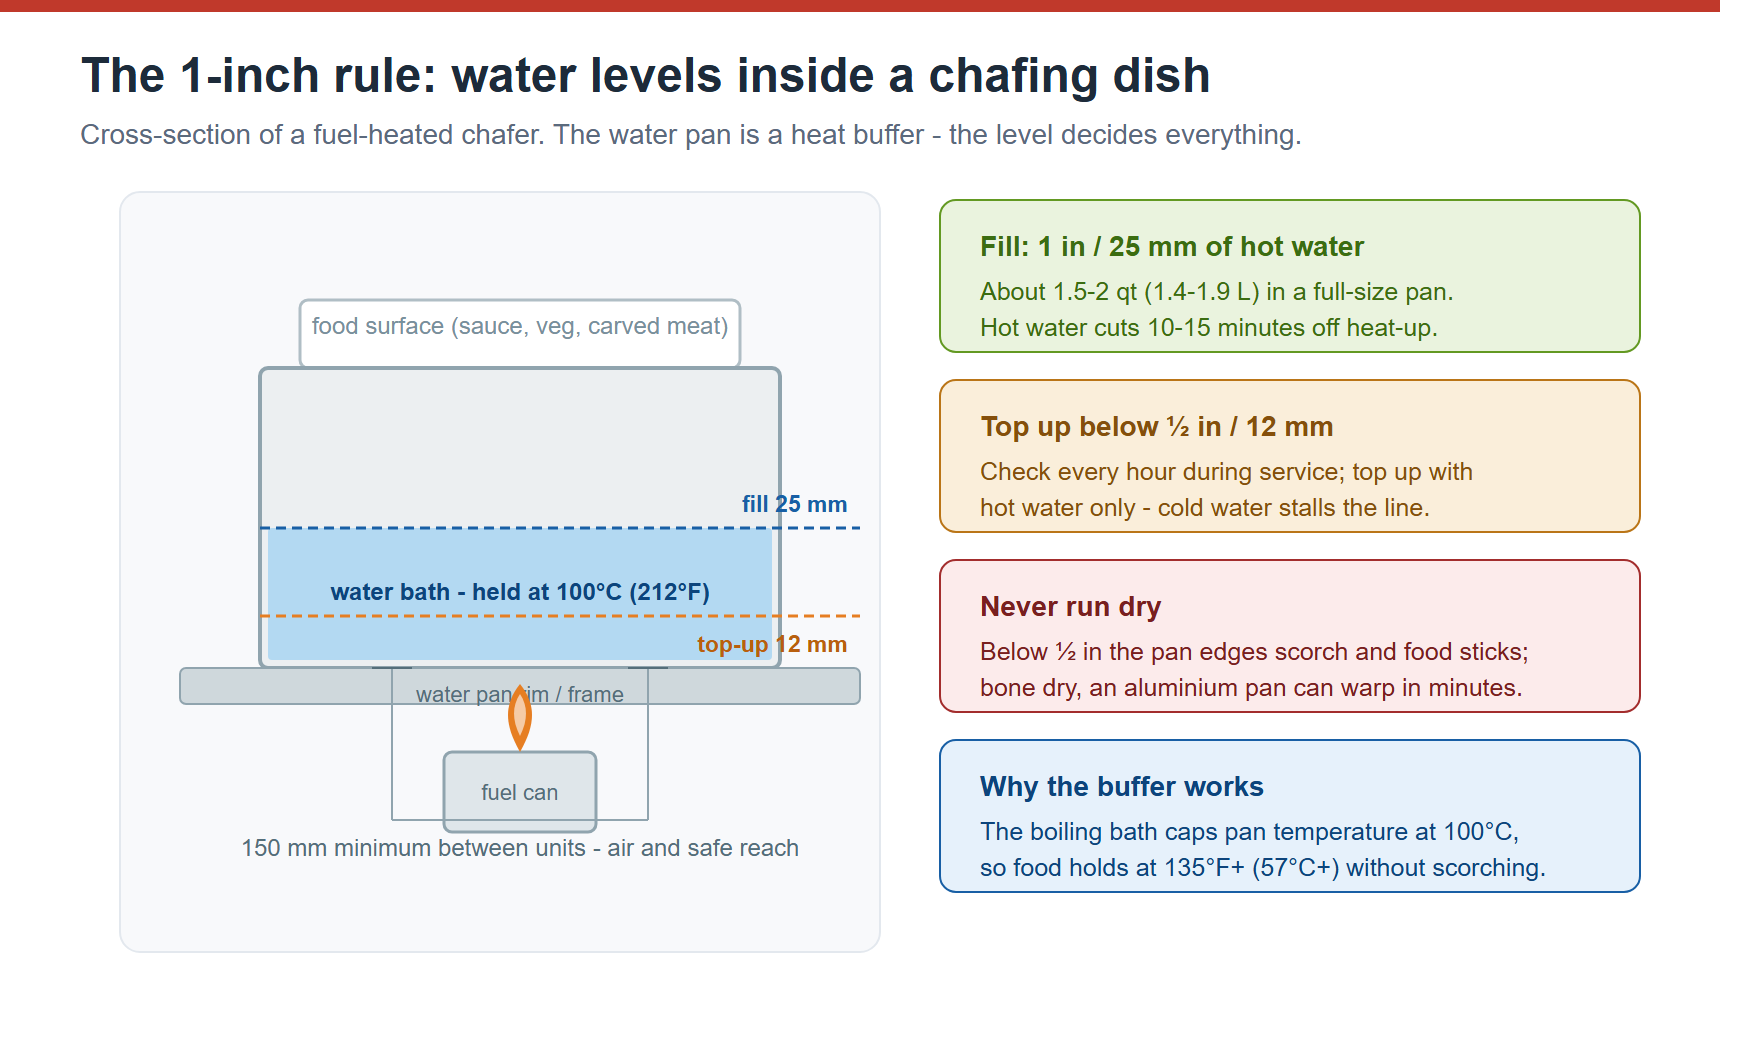
Short answer: put about 1 inch (2.5 cm) of hot water — roughly 1.5–2 quarts (1.4–1.9 L) for a full-size pan — in the water pan, set the lit fuel can centrally beneath it, load the food pan, and preheat 15–20 minutes until the product reaches 135°F (57°C). Never let the water pan run dry. All configurations: chafing dish collection.
Setup at a glance
- Water: 1 inch (2.5 cm) of hot water — never let the pan run dry
- Fuel: one can centred directly under the pan, lit with a long-reach lighter
- Food: fill the food pan two-thirds maximum
- Preheat: 15–20 minutes covered
- Serve at: 135°F (57°C) minimum, ideally 140–150°F (60–65°C)
- Total time: about 25 minutes from frame to service
Why the water matters
The water pan acts as a heat buffer held at 100°C (212°F) — the boiling point — so delicate food cannot scorch even when the flame is strong. It also supplies humidity that delays drying. Below roughly half an inch of water, the exposed pan edges scorch and food sticks; completely dry, an aluminium pan can warp within minutes.
Seven-step setup
1. Set the frame
Place the frame on a heat-proof surface with at least 150 mm between units so guests can reach safely and air can circulate.
2. Water pan
Add about 1 inch (2.5 cm) of hot tap water. Cold water adds 10–15 minutes to heat-up, which matters when service starts at 11:30 sharp.
3. Fuel
Place the can in the holder, keep the lid on until lit, light with a long-reach lighter, and slide the holder until the flame sits directly under the pan centre. One standard can burns about 2 hours.
4. Load food
Fill the food pan no more than two-thirds, then place it in the water pan. Press the pan down to expel any air lock so it floats on the water.
5. Preheat
Cover and preheat 15–20 minutes. Probe the centre: you need 135°F (57°C) minimum before guests arrive, ideally 140–150°F (60–65°C).
6. Serve
Use one dedicated serving utensil per pan, resting on the lid rest or a side holder. Keep the cover closed between guests.
7. Monitor
Check water every hour and top it up with hot water; confirm temperature hourly; put the lid on before any break.
Water level cheat sheet
| Chafer size | Depth of water | Approx. volume | Top up when |
| Full size GN 1/1 | 1 in / 25 mm | 1.5–2 qt (1.4–1.9 L) | Below ½ in / 12 mm |
| Half size GN 1/2 | 1 in / 25 mm | 0.7–1 qt (0.7–0.9 L) | Below ½ in / 12 mm |
| Round Ø 350 mm | 1 in / 25 mm | 0.6–0.9 qt (0.6–0.8 L) | Below ½ in / 12 mm |
| Round Ø 400 mm | 1 in / 25 mm | 0.8–1.1 qt (0.8–1.0 L) | Below ½ in / 12 mm |
Fuel handling safety
- Never refuel or move a lit frame; allow cans to cool at least 30 minutes.
- Extinguish with the can lid on a flat metal surface or a snuffer — never water.
- Keep a Class K or multipurpose extinguisher within 10 metres of any open-flame line.
- Do not place lit units beneath drapes, decorations or low signage.
- Wipe spills immediately; gelled fuel is slippery and burns.
Common setup faults and their fix
| Symptom | Likely cause | Fix |
| Food at 110°F (43°C) after 30 min | Cold start water, thin water layer | Use hot water, keep 1 in / 25 mm, preheat 20 min |
| Flame keeps going out | Draught under the frame | Add wind guard, turn frames away from airflow |
| Pan floats unevenly | Air lock under the food pan | Press the pan down to release trapped air |
| Food scorched at the edges | Water below ½ in / 12 mm | Top up hourly with hot water |
| Lid drips on the tablecloth | Condensation, no lid rest | Use a recessed lid rest and open the lid away from the cloth |
Spend the extra two minutes on the pre-service probe every single time. An unprobed pan is how an otherwise perfect service turns into a complaint.
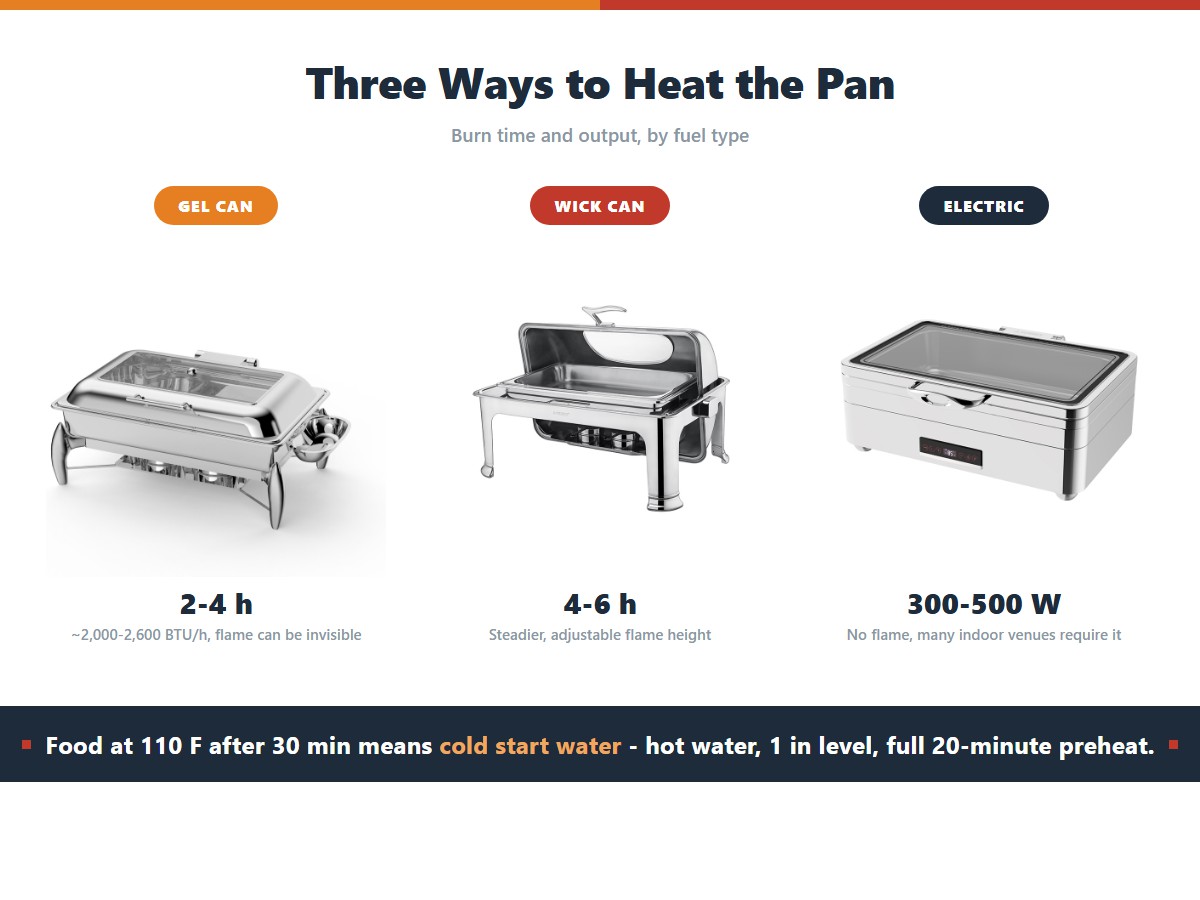
Fuel can types compared
| Fuel type | Burn time | Heat output | Safety notes |
| Gel alcohol can | 2–4 h depending on format | ~2,000–2,600 BTU/h | Flame may be invisible in bright light; check before reaching |
| Wick fuel can | 4–6 h | Similar, steadier | Adjustable flame height |
| Methanol / liquid pour fuel | varies | Highest | Higher risk of flare-up and spill; not recommended for open lines |
| Electric cartridge | n/a | 300–500 W | No flame; many indoor venues require it |
Whatever you use, always light with a long-reach lighter, keep your hand to the side rather than above the can, and never relight a can that is still warm. Cans stay hot for about 30 minutes after the flame is out — treat spent cans as waste only once cool to touch.
If you run electric chafers
The setup is identical minus the flame: swap the fuel holder for the heating element, then keep everything else — 1 inch (2.5 cm) of hot water, a two-thirds food load, cover on.
- Preheat: allow 20–25 minutes. Electric elements warm the bath more slowly than an open flame, so start earlier on tight turnarounds.
- Control: set the thermostat to hold 140–150°F (60–65°C) instead of maximum. The water bath already prevents scorching, and a lower setting saves 20–30% electricity.
- Water still matters: the bath protects the element as well as the food — a dry pan is the fastest way to burn out a heating element.
- Venue rules: many hotels, conference centres and marquees ban open flame outright, which is why electric chafing dishes are the default for indoor banquet work. For full line layouts, see our buffet station equipment guide.
Frequently Asked Questions
How much water goes in a chafing dish water pan?
About 1 inch (2.5 cm), which is 1.5–2 quarts (1.4–1.9 L) in a full-size pan. Use hot water and top up before the level drops below half an inch.
Can I use a chafing dish without water?
Not recommended. Without the water buffer, the food scorches on the bottom, dries out quickly and can damage thin pans. If you must, keep heat very low and stir frequently.
How long does the setup take?
Allow 20–25 minutes: 5 minutes assembling, 15–20 minutes preheat. With hot water and preheated pans most units reach 140°F (60°C) in about 15 minutes.
How many fuel cans should I budget?
One can per pan per two hours plus 20% spares. Cold venues, wind and cold start water can shorten this by 10–20%.
Can I set up outdoors?
Yes, with a wind guard, a level surface and extra fuel — wind can strip 20–30% of the effective heat. See off-site catering holding tips.